If you have ever updated your WordPress site, refreshed the page, and wondered why nothing changed, you already know the frustration that caching can cause. You made the edit. You saved it. But your website still shows the old version. This happens to almost every WordPress owner at some point, and the reason is almost always the cache.
This guide walks you through exactly what WordPress cache is, why it exists, and how to clear it properly across every layer where it can hide, including your plugin, your browser, your hosting account, and Cloudflare.
Quick Answer
To clear WordPress cache, go to your caching plugin (such as WP Rocket, LiteSpeed Cache, or W3 Total Cache) and click the Clear Cache or Purge All Cache button. Then clear your browser cache separately, and if you use Cloudflare, purge the cache from your Cloudflare dashboard as well. Changes usually appear within a minute once every layer is cleared.

Key Takeaways
- WordPress cache stores a saved copy of your pages so they load faster for visitors
- Clearing cache is different from clearing your browser cache; they are two separate things
- There are usually four cache layers involved: plugin, browser, hosting, and CDN
- Most “my changes aren’t showing” issues come from having more than one active cache layer
- Clearing cache too often can actually slow your site down for real visitors
- Cloudflare cache and WordPress plugin cache must both be purged after big updates
- A proper cache clearing routine prevents most WordPress display problems
What is WordPress Cache
Every time someone visits a WordPress page, your server normally has to run PHP code, query the database, and assemble the page from scratch. This works fine for small blogs with little traffic, but it becomes slow once your site grows.
Cache solves this by saving a ready-made copy of the finished page. When the next visitor arrives, the server hands them that saved copy instead of rebuilding everything again. This is why cached sites load faster and handle more visitors at once.
The tradeoff is that this saved copy does not automatically know when your content has changed. It keeps serving the old version until something tells it to update. That “something” is the cache-clearing process you are here to learn.
Why Should You Clear Cache
Clearing cache matters because it directly affects what your visitors see. If you publish a new blog post, update your pricing, fix a typo, or change an image, and the cache is not cleared, your audience keeps seeing outdated information.
This becomes a real problem in a few situations. An online store owner who updates product prices but forgets to clear the cache may end up displaying the wrong price to customers. A business owner who fixes a broken link on their homepage might still see the broken link because their browser is showing a cached version.
There is also a technical side to this. Search engines occasionally crawl cached versions of pages, so if your site has ongoing WordPress performance issues linked to outdated cache, it can subtly affect how your content is indexed and displayed.
When Should You Clear the Cache?
You do not need to clear the cache constantly. In fact, doing so too often removes the performance benefit cache is supposed to give you. Instead, clear it at specific moments.
Clear your cache after:
- Publishing or editing a post or page
- Updating a plugin or theme
- Changing your site’s CSS or design
- Installing a new plugin
- Making changes to WooCommerce products or pricing
- Noticing that recent changes are not visible on the live site
If none of these apply, there is usually no need to touch your cache settings. Most caching plugins also handle this automatically in the background, clearing relevant cache the moment you save a post.
Different Types of WordPress Cache
Understanding the different cache layers is the part most beginners skip, and it is exactly why they get confused later. WordPress sites typically involve up to four separate caching systems, and each one needs to be cleared on its own.
Page Cache
This is the cache created by your WordPress plugin, such as WP Rocket or LiteSpeed Cache. It saves a static HTML version of your page so WordPress does not have to rebuild it every time.
Browser Cache
Your visitor’s own browser stores files like images, CSS, and JavaScript locally so it does not need to download them again on the next visit. This is separate from your website entirely and lives on the visitor’s device.
Hosting or Server Cache
Many hosting companies run their own caching system at the server level, completely separate from any plugin you installed. Some hosts like SiteGround, Kinsta, and WP Engine have proprietary caching that must be cleared through their own dashboard, not just your WordPress plugin.
CDN Cache
If you use a content delivery network such as Cloudflare, your files are also cached on servers spread across different countries. This speeds up loading for visitors far from your main server, but it means another layer needs to be purged separately.
Object Cache
This stores database query results so WordPress does not repeat the same query over and over. It is common on larger sites using Redis or Memcached.
How to Clear WordPress Cache
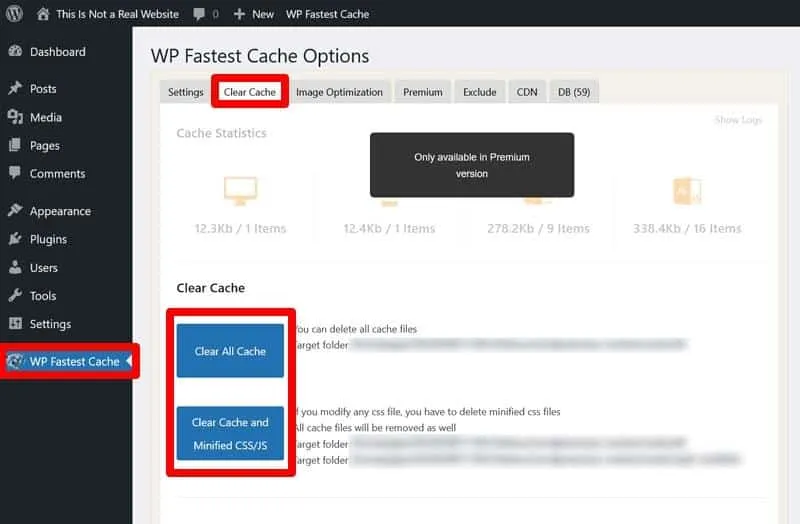
Now let’s go through the actual steps. Each of the four main layers has its own process, and you generally want to clear them in this order: plugin cache first, then hosting cache, then CDN cache, and finally check your own browser.
Clearing WordPress Plugin Cache
If you use a caching plugin, the process is usually just a few clicks.
WP Rocket
Go to Settings, then WP Rocket, then click the Clear Cache button at the top of the page. You can also clear cache for a single page by opening it from the front end and clicking Clear Cache in the admin toolbar at the top.
LiteSpeed Cache
Go to LiteSpeed Cache in your dashboard sidebar, then click Purge All under the Toolbox tab. If your host runs LiteSpeed servers, this plugin also clears the server-level cache at the same time.
W3 Total Cache
Go to Performance in your dashboard, then click Empty All Caches. Be aware that misconfigured settings here can sometimes cause more harm than good, which ties into broader W3 Total Cache security considerations that are worth reviewing if your site handles sensitive customer data.
Clearing Browser Cache
This step lives entirely on your own computer, not your website. To clear it in Chrome, open Settings, go to Privacy and Security, then Clear Browsing Data, and select Cached Images and Files.
A quicker method that most developers use daily is a hard refresh. On Windows, press Control, Shift, and R together. On Mac, press Command, Shift, and R. This forces the browser to reload everything fresh without deleting your saved passwords or browsing history.
Clearing Hosting Cache
If your hosting provider offers server-level caching, you typically need to log into their control panel separately from WordPress. SiteGround has a Speed Optimizer section with a dedicated Purge Cache button. Kinsta has a cache tool inside its own custom dashboard called MyKinsta. WP Engine includes a Purge All Caches option under the WP Engine menu inside your WordPress admin sidebar.
If you are not sure whether your host caches at the server level, it is worth checking their documentation or support chat, since this is one of the most overlooked steps when someone says their WordPress performance issues have not gone away after clearing the plugin cache.
Clearing Cloudflare Cache
Log into your Cloudflare account and select your website. Go to the Caching section, then click Purge Everything. This removes every cached file across Cloudflare’s entire network so your latest version is served everywhere.
For smaller updates, you can also use the Custom Purge option to clear cache for a single URL instead of the entire site, which keeps your overall site speed benefits intact while still refreshing the specific page you changed.
Common Cache Problems
Most cache-related complaints fall into a handful of repeating patterns.
The most common one is a visitor seeing an old version of a page while the site owner sees the new version. This almost always means the visitor’s browser cache is outdated while the owner cleared theirs already.
Another frequent issue involves CSS or design changes not appearing at all, even after clearing the plugin cache. This usually points to Cloudflare still serving the old stylesheet, since the CDN cache is separate from your WordPress plugin.
A third pattern shows up on WooCommerce stores, where a product price update does not reflect on the storefront. This typically means the page cache was not cleared for that specific product page after the change was saved.
Troubleshooting Guide
If clearing cache does not solve your problem, work through these checks in order.
First, confirm you actually cleared every layer, not just the plugin. It is easy to clear your WordPress cache and forget Cloudflare entirely.
Second, open the page in an incognito or private browser window. This bypasses your local browser cache completely and shows you what a new visitor would actually see.
Third, check whether your hosting provider has its own server-level cache running independently of your plugin. Many beginners assume the WordPress plugin controls everything, when the host is often caching separately underneath it.
Fourth, if the issue only affects one specific page, look for page-level cache exclusions in your plugin settings, since some pages may need to be manually excluded from caching altogether, such as a cart page or a login page.
Fifth, disable caching temporarily to confirm whether the cache is really the cause. If the problem disappears with the cache off, you know exactly where to focus your cleanup.
DazzleBirds Approach to Resolving WordPress Cache Issues
Understanding the Caching Issue
The first thing we would do is understand what type of caching issue you’re experiencing, because not all cache-related problems have the same cause.
We would identify:
- Whether website changes are not appearing
- Whether the issue affects the entire website or specific pages
- When the problem first started
- Recent plugin, theme, or server changes
- Whether a caching plugin, CDN, or hosting cache is being used
- Whether the issue occurs for all visitors or only certain users
This initial assessment helps determine whether the problem is related to browser caching, WordPress caching, server-level caching, or a content delivery network (CDN).
Reviewing the Website’s Caching Configuration
Once we understand the issue, we would review how caching has been configured across the website.
We would examine:
- Active WordPress caching plugins
- Cache plugin settings
- Browser caching rules
- Object caching configuration
- Page caching settings
- CDN integration (such as Cloudflare)
- Server-level caching provided by the hosting platform
The goal is to ensure every caching layer is configured correctly and not preventing updated content from being served.
Verifying Every Cache Layer
WordPress websites often use multiple cache layers simultaneously.
We would systematically verify:
- WordPress page cache
- Browser cache
- CDN cache
- Server cache
- Object cache
- OPCache (if enabled)
This step ensures that outdated cached files are removed from every layer, not just the WordPress plugin.
Identifying the Root Cause
Based on our findings, we would investigate common causes such as the following:
- Expired or stale cache
- Incorrect caching plugin settings
- CDN synchronization delays
- Hosting cache conflicts
- Browser cache retaining outdated assets
- CSS or JavaScript minification conflicts
- Plugin compatibility issues
- Theme-related caching problems
Rather than repeatedly clearing the cache, we focus on identifying why stale content continues to be served.
Testing & Validation
After clearing or reconfiguring the cache, we would validate that the issue has been fully resolved.
This includes testing:
- Updated pages and posts
- Images and media files
- CSS and JavaScript changes
- Navigation menus
- WooCommerce product updates
- Mobile and desktop versions
- Multiple browsers and devices
We also verify that visitors receive the latest version of the website without affecting performance.
Optimizing the Caching Strategy
Once the issue is resolved, we would optimize the overall caching configuration to balance speed and content freshness.
This may include:
- Configuring automatic cache purging
- Excluding dynamic pages from caching
- Optimizing browser cache settings
- Improving CDN cache rules
- Fine-tuning cache expiration policies
- Removing unnecessary or conflicting caching plugins
A well-configured caching strategy improves both website performance and reliability.
Ongoing Monitoring
To reduce future cache-related issues, we recommend implementing ongoing monitoring and maintenance.
This includes:
- Regular cache health checks
- Plugin update reviews
- CDN monitoring
- Performance testing
- Core Web Vitals analysis
- Cache purge validation after website updates
Routine monitoring helps ensure visitors always see the latest content while maintaining fast page load times.
Expected Outcome
The result is a properly configured WordPress caching system that delivers fast page load times while ensuring website updates appear correctly across browsers, devices, hosting environments, and CDN layers.
By addressing the root cause rather than simply clearing the cache, we help create a more reliable and consistent experience for both website owners and visitors.
Best Practices
A good caching routine is less about clearing the cache often and more about clearing it correctly when it matters.
Set your caching plugin to automatically purge the cache whenever you publish or update a post, so you do not need to remember to do it manually every time. This is a basic part of any WordPress maintenance checklist and saves a lot of guesswork later.
Avoid installing more than one caching plugin at the same time. Running two page cache plugins together often causes conflicts rather than extra speed, and troubleshooting becomes much harder when you cannot tell which plugin is responsible for what.
If your site relies heavily on dynamic content, such as a membership area or a store with frequently changing stock levels, consider excluding those specific pages from caching entirely rather than clearing the cache constantly.
Review your cache settings whenever you go through general WordPress performance optimization, since outdated cache rules are a common reason sites feel slower than they should even after other improvements have been made.
If you plan on customizing your WordPress theme or changing your WordPress website structure, always clear every cache layer afterward, since design changes are the most common source of visible caching problems.
Conclusion
Cache exists to make your WordPress site faster, not to make your life harder. The confusion usually comes from not realizing how many separate layers are involved, from your plugin to your browser to your host to your CDN.
The next time a change does not appear on your live site, work through each layer one at a time instead of guessing. Clear your plugin cache, check your hosting dashboard, purge Cloudflare if you use it, and finally test in a private browser window.
Once you understand where each cache layer lives and when to clear it, these issues become quick to solve rather than a recurring headache. And if problems keep coming back despite doing everything right, that is usually a sign of a deeper configuration issue worth investigating properly, similar to how WordPress taxonomies or overall WordPress development process decisions can quietly affect performance long after the initial setup.
FAQs
No. Cache only stores a temporary copy of your pages for faster loading. Clearing it does not affect your posts, pages, media, or database in any way.
Briefly, yes. The very next visitor after a cache clear will experience a slightly slower load time because the page has to be rebuilt and saved again. After that first visit, speed returns to normal.
Only after making changes that affect what visitors see, such as content edits, design updates, or plugin changes. There is no need for a regular clearing schedule beyond that.
Yes, they solve different problems. Cloudflare caches your site across a global network to speed up delivery to visitors far from your server, while a plugin caches the actual page generation happening inside WordPress.
Most modern caching plugins include this by default. Check your plugin's settings for an option labeled something like Automatic Cache Purge or Clear Cache on Update, usually found under general or advanced settings.
WordPress Cache


 WooCommerce Solutions
 Solutions for WordPress